
Getting inventory to customers on time is extremely important to businesses that have warehouses or manufacturing facilities. Typically, inventory is tracked in a software system such as NetSuite, a popular cloud-based enterprise resource planning (ERP) system. Businesses make decisions based on the financial information used for auditing, forecasting, analysis, and reporting, and if inventory controls are not in place, the information they rely on will not be up-to-date or accurate. Inventory adjustments are a critical part of ensuring that financial information is correct.
What Are Inventory Adjustments?
Inventory adjustments are manual changes to the inventory of an item to mark it as available or unavailable. In NetSuite, the adjust inventory form allows for the changing of an inventory item without entering a purchase order.
Common Reasons for Inventory Adjustments
Many reasons can cause inventory to need an adjustment, such as:
- Cost changes
- Cycle counts
- Location transfers
- Errors in counting inventory
- Waste
- Theft/Shrinkage
- Problems with stock
- Breakage
- Internal use
When these situations arise and inventory in the database does not match with physical inventory, inventory adjustments are required to be made. Ultimately, with an inventory adjustment, all of these situations can be rectified and the adjustments will hit the proper G/L accounts.
Methods for Making Inventory Adjustments in NetSuite
Manually Directly in NetSuite
NetSuite offers powerful tools for managing financial processes, but entering inventory adjustments in the UI can be manual and take a significant amount of time, especially if you have a large number of adjustments to process, complex data to input, or adjustments with many lines of data.
CSV Imports for Inventory Adjustments
CSV import is another option for inventory adjustments to NetSuite but this can also be time-consuming. To ensure that the inventory adjustment imports correctly, it is important to have all the column headings notated correctly ahead of time. Unfortunately, no error resolution will be present prior to importing so after the import, it is important to double-check that all of the data came in as expected.
Using ExtendInsights for Inventory Adjustments in NetSuite
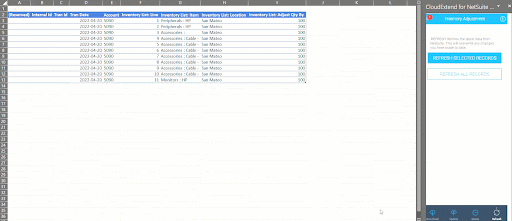
ExtendInsights makes it much easier to handle inventory adjustments, even with serialized or lot-numbered items, in a few easy steps by allowing users to work directly in Excel. This saves significant time when handling bulk inventory adjustments with many lines. ExtendInsights provides real-time error resolution (see step 2) so users can be confident that the upsert to NetSuite was successful.
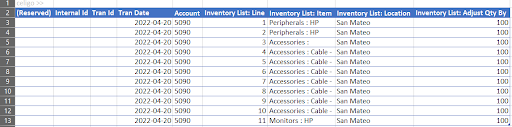
Step 1: Fill out the table with Account for the adjustment, item, location, and adjust qty by field values.
Step 2: Go to the Update button and click Upsert All Records. The internal Id will show up in column B once successfully generated in NetSuite.
How to Check New Inventory Adjustments in NetSuite
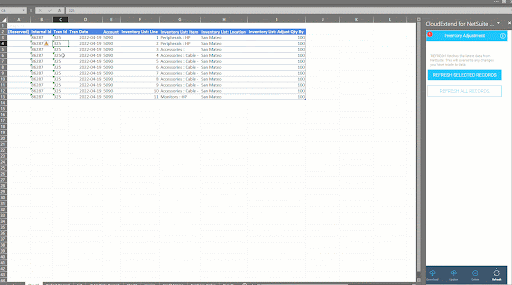
Since you have the TranID, you can use that to easily search your newly created record in NetSuite.
Step 1: After the record has been created, click Refresh to pull in the TranID generated by NetSuite and copy it to your clipboard.
Step 2: In NetSuite, go to the search box and paste or type the TranID
To learn more about inventory adjustments with ExtendInsights, please visit our support article.
Try ExtendInsights Free Today